The best way to utilize Sahha after the SDK has been installed into your app (or if you're using the Sahha Demo App) is via the Sahha Webhooks.
Via the Sahha Webhooks you can choose which data you want to stream to any URL (such as an API endpoint or cloud function)
In this example, we are going to stream data from Sahha to a Firebase Firestore database using Firebase Functions and Sahha Webhooks.
Firstly, make sure you have a Sahha SDK successfully installed within your app, or setup the Sahha Demo app so that you have an application to collect data through. This is a key step.
Secondly, install firebase and create a firebase functions project in TypeScript.
For this tutorial, we've assumed you have successfully create a Firebase account and initiated a fresh TypeScript firebase function project. You can learn how to install firebase and create a fresh firebase functions project using this tutorial. Otherwise follow these steps below:
Open up a terminal and install the Firebase CLI: via npm, use: npm install -g firebase-toolsThis installs the globally available firebase command.
To initialize your project: Run firebase login to log in via the browser and authenticate the Firebase CLI.
Go to your project directory.
Runfirebase init functions. The CLI prompts you to choose an existing codebase or initialize and name a new one. When you're just getting started, a single codebase in the default location is adequate; later, as your implementation expands, you might want to organize functions in codebases.
The CLI gives you these options for language support, for this project choose TypeScript
The CLI gives you an option to install dependencies. Install them.
After these commands complete successfully, your project structure looks like this:
myproject
+- .firebaserc # Hidden file that helps you quickly switch between
| # projects with `firebase use`
|
+- firebase.json # Describes properties for your project
|
+- functions/ # Directory containing all your functions code
|
+- .eslintrc.json # Optional file containing rules for JavaScript linting.
|
+- package.json # npm package file describing your Cloud Functions code
|
+- index.ts # Main source file for your Cloud Functions code
|
+- node_modules/ # Directory where your dependencies (declared in
# package.json) are installed
Now, let's get started coding.
First, create a Firebase Cloud Function in TypeScript (if you haven't yet) to receive the data we stream via the Sahha Webhooks. We've written one here that is rather explanatory.
We've imported the necessary packages from firebase.
We created a function called onRequest which handles the webhook data stream and categorizes the request data according to either Sahha biomarkers, insights or scores
We created a function called writeData that writes the data received from the onRequest function to Firestore
It's that simple. Feel free to copy and paste this code into your index.ts file in your firebase functions project.
typescript
import {onRequest} from "firebase-functions/v2/https";
import * as logger from "firebase-functions/logger";
const {initializeApp} = require("firebase-admin/app");
const {getFirestore} = require("firebase-admin/firestore");
//init firebase
initializeApp();
// write data to firestore collection
const writeData = async (dataToWrite: any, collectionName: string) => {
// Push the modified content into Firestore
let writeResult = await getFirestore()
.collection(collectionName)
.add(dataToWrite);
console.log("data written: ", writeResult);
return writeResult;
};
//handle the data from Sahha
export const handleWebhook = onRequest(async(request, response) => {
let collection = "none";
const expr = request.headers["x-event-type"]?.toString() || "defaultEventType";
let writeResult = null;
const content = request.body;
// Log info
logger.info("Hello logs!", {structuredData: true});
//log request
console.log("Request data: ", request.headers, request.body);
// handle x-event-type and set firebase firestore collection name
switch (expr) {
case "BiomarkerCreatedIntegrationEvent":
console.log("Biomarker created");
collection = "biomarker";
break;
case "DataLogReceivedIntegrationEvent":
console.log("Data log received");
collection = "device_data";
break;
case "ScoreCreatedIntegrationEvent":
console.log("Score created");
collection = "score";
break;
default:
collection = expr;
console.log(`Collection created at ${expr}.`);
}
// Merge externalId into the content object within Firestore
await writeData(content, collection);
// Send back a message that we've successfully written the content to Firestore
response.json({ result: `Message: ${writeResult} added.` });
});
Now, the final step is to run firebase deploy —only functions and push your function live
Important step: You will likely need to add the Blaze Plan to your firebase account, this will allow you to use Firebase Functions. This is a pay as you go plan that is very cheap if not free for small projects.
Next step, let's head to the Sahha Dashboard
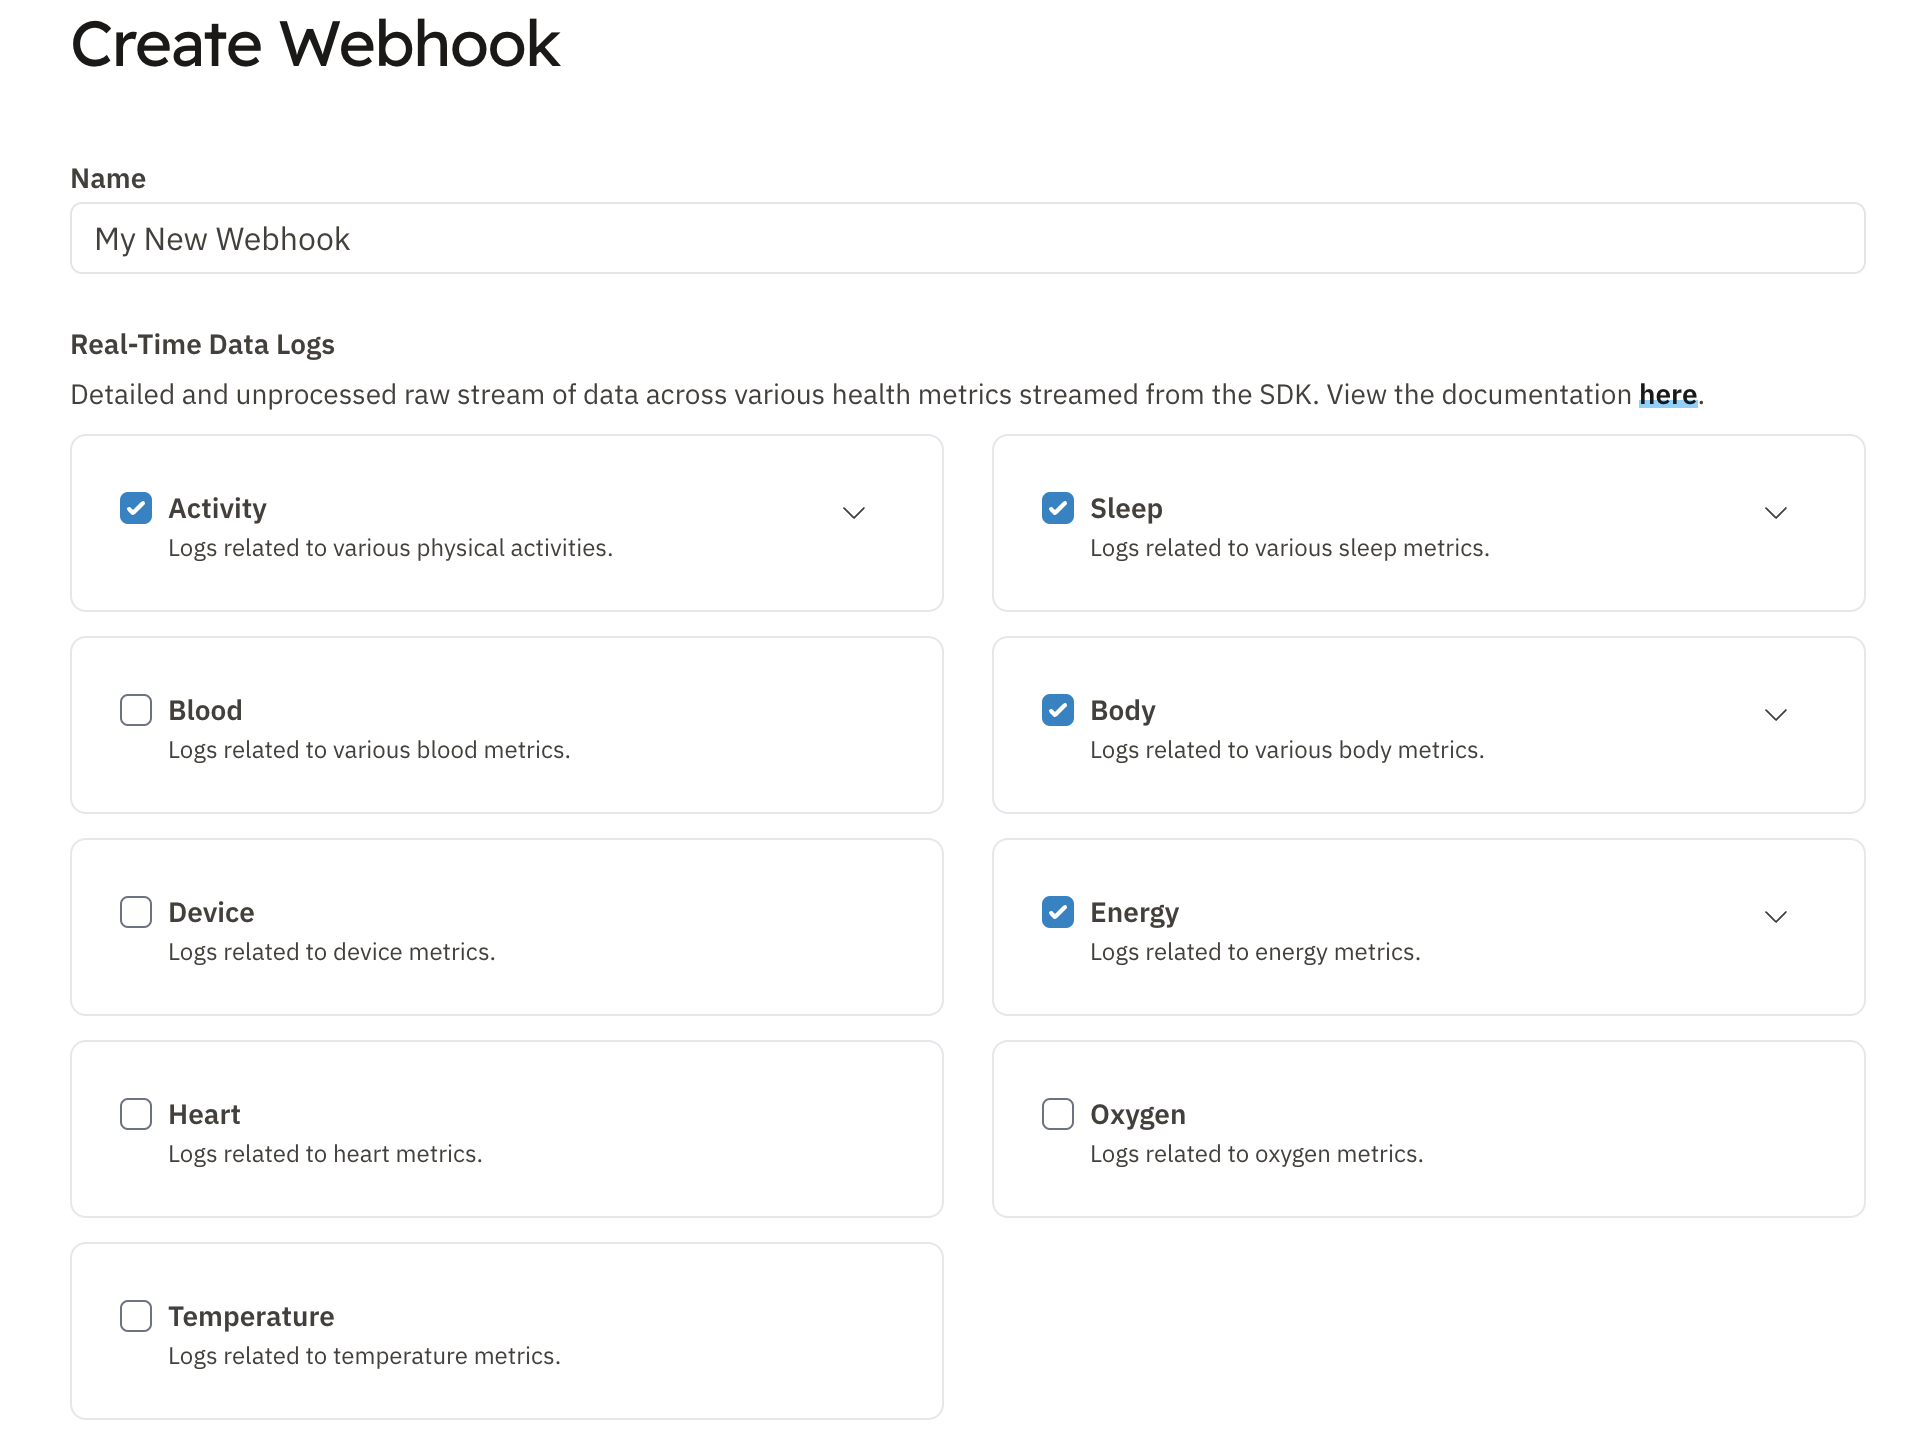
Navigate to the webhooks section of the dashboard, and create a new webhook by clicking the "+ webhook" button
Next, you'll be asked to give your webhook a name and select the data you'd like to receive.
create a webhook page of the Sahha Dashboard
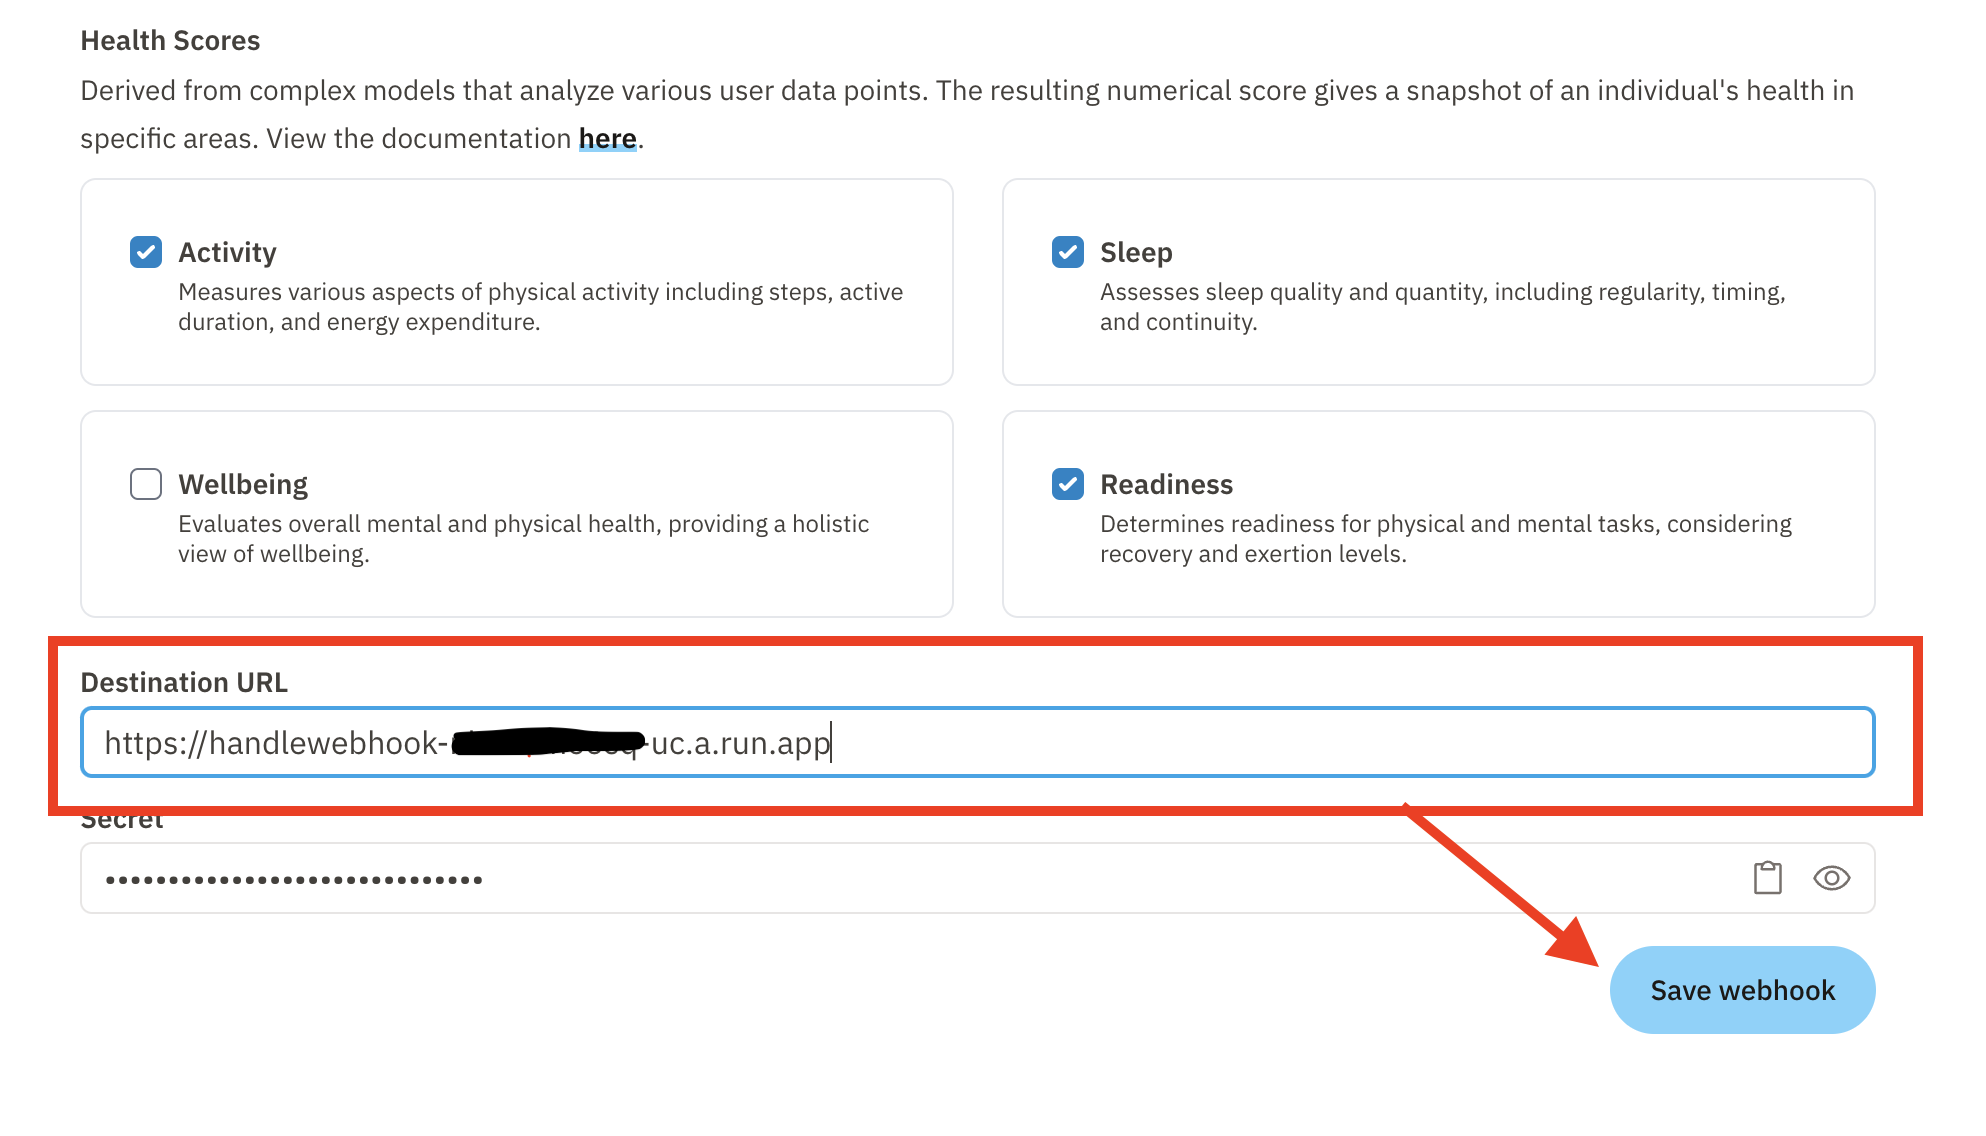
Once you've selected what you need to receive, scroll down and you'll be asked to input your Destination URL.
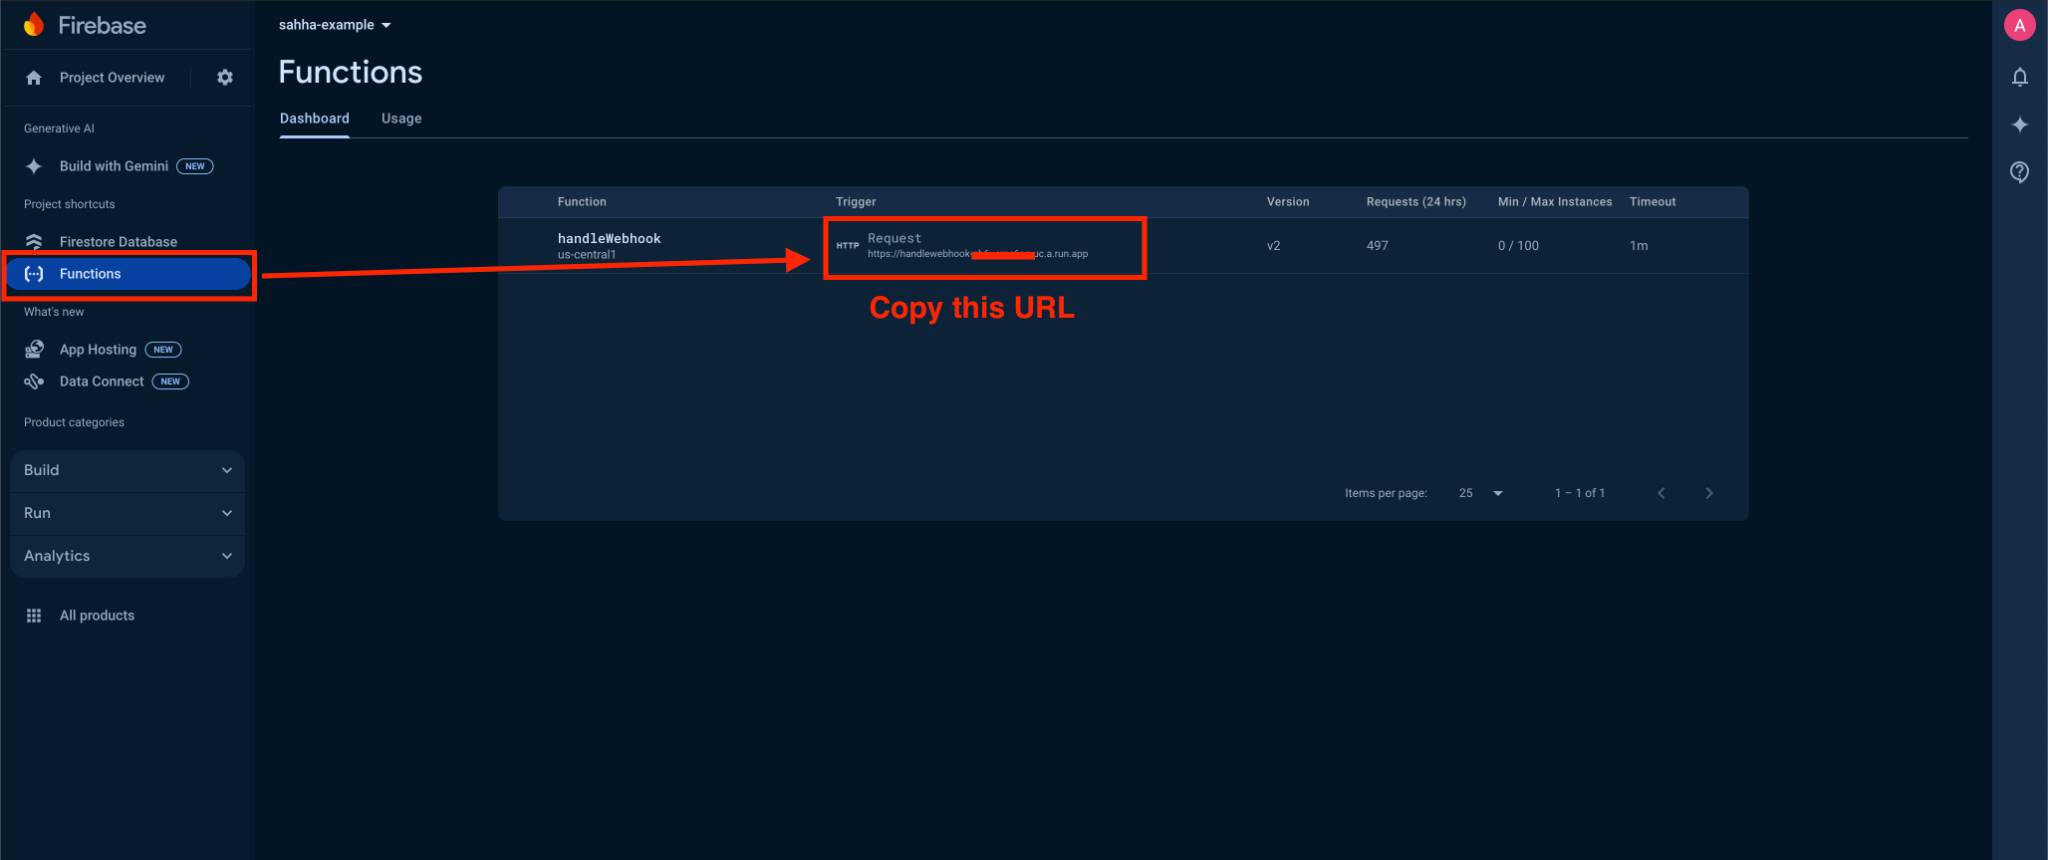
Head over to your Firebase dashboard and copy your deployed firebase function URL from firebase. If you have correctly deployed your Firebase Function, the below image is what you should see.
Finding your firebase function URL
Add the firebase function URL you copied to the webhooks URL input in Sahha Dashboard, and save the webhook
Adding your destination URL
Now, sit back and watch the data roll in to your Firestore from your new Sahha Webhook